After upgrading current 11.1.1.4 environment to 11.1.1.7, observed below errors in SOA server Logs. This error comes every time while starting of each of the SOA managed servers.
<Error> <oracle.sdp.messaging.engine> <SDP-25088> <Unable to refresh the driver locator cache, due to the following error:
Exception Description: The method [setSuccessStatusType] on the object is throwing an exception.
Argument: [null]
Internal Exception: java.lang.reflect.InvocationTargetException
Target Invocation Exception: java.lang.IllegalArgumentException: The successStatusType must be of success type and not equal to null
Mapping: oracle.toplink.mappings.TransformationMapping[successStatusType]
Descriptor: RelationalDescriptor(oracle.sdpinternal.messaging.AddressImpl --> [DatabaseTable(ADDRESS)])>
<Warning> <oracle.toplink.default> <BEA-000000> <
Exception [TOPLINK-106] (Oracle TopLink - 11g Release 1 (11.1.1.6.0) (Build 111018)): oracle.toplink.exceptions.DescriptorException
Exception Description: The method [setSuccessStatusType] on the object is throwing an exception.
Argument: [null]
Internal Exception: java.lang.reflect.InvocationTargetException
Target Invocation Exception: java.lang.IllegalArgumentException: The successStatusType must be of success type and not equal to null
Mapping: oracle.toplink.mappings.TransformationMapping[successStatusType]
Descriptor: RelationalDescriptor(oracle.sdpinternal.messaging.AddressImpl --> [DatabaseTable(ADDRESS)])
Similar errors are observed when User Messaging Service option is accessed.
a. Login to the Enterprise Manager.
b. From the left hand tree expand 'User Messaging Service' and select 'usermessagingserver (ServerName)'.
c. In the right hand pane select 'User Messaging Service' drop down and then 'Message Status'.
d. We get the same error on the em console and in the logs.
Cause:
In ORASDPM database, we can find that for all the rows, the success_status column is null.
select count(*) from address where success_status is null
Solution:
Execute following SQL Commands in your ORASDPM database.
SQL> conn _ORASDPM/: -- Connect ORASDPM database of your environment
SQL> update address set success_status='DELIVERY_TO_GATEWAY_SUCCESS' where success_status is null;
SQL> commit;
Restart managed SOA Servers and this error shoud no longer exist.
After upgrading the SOA Suite 11.1.1.4 cluster server to 11.1.1.7 (PS6), it is observed that the em Enterprise Manager Console (em console) is loading very slow and sometimes takes more than 120 seconds. Sometimes, trying to access any composite link will time out and leads to em home page again. In short, Fusion Middleware Control UI performance goes unpredictable in upgraded environment.
Log Files may show following statement:
ExecuteThread: '0' for queue: 'weblogic.kernel.Default (self-tuning)'] WARN emd.targets setContents.101 - Label Servlet/JSP By Server - Request Processing Time (since startup) (ms) very long. Has been truncated.
Cause:
As the number of fmwc monitored targets increases, the login times on em console goes up as well. fmwc discovery is always performed as part of login. Time delay or Time out is expected because EM discovery MBeans need to be invoked for every target.
Solution:
Oracle has provided solution to this problem under Oracle Support RaV Note "How to Enable Discovery Cache To Avoid Long Delay During Login To Fusion Middleware Control (Doc ID 1423893.1)".
Solution is to cache the discovery results in the servlet context and use it for subsequent logins. This discovery result will be shared by all the fmwc users. This will still require the entire discovery to be done at least once. If the initial login is slow due to discovery of large number of targets, changes in this note will not reduce the initial login delay.
If the caching is enabled, fmwc will use the cached discovery results.
The default setting is "not use the cached results"
However, this solution is applicable only to version 11.1.1.2.0 to 11.1.1.6.0. If you are on pre-11.1.1.6 environment, please install the patch 13251077. Then follow the steps below.
If you are on 11.1.1.6 or on 11.1.1.7, Patch installation is not required as it is already part of 11.1.1.6+ version.
1. Open Enterprise Manager Console. On the left panel, navigate to Weblogic Domain --> . Right click and from the context Menu select the option "System MBean Browser".
2. Access the MBean Propery in the tree at Application Defined MBeans --> emosms.props --> Server: Your_Admin_Server_Name_Here --> Application:em --> properties --> emoms.properties. Then on top of theright hand panel expand the option Show MBean Information", it should look something like below:
3. On Right Panel, Select tab Operations, click on setProperty
4. Enter following three key-value pair one by one and Invoke the setProeprty() operation.
# Enable caching of Discovery data and use it for other subsequent users.
# Values=true/false Default=false Key: oracle.sysman.emas.discovery.wls.FMW_DISCOVERY_USE_CACHED_RESULTS
Value: true
# If caching of discovery data is true, this parameter indicates how long the discovery data
# from cache should be used before requiring a fresh discovery.
# Time value is in milliseconds. Default is 7200000 milliseconds. Key: oracle.sysman.emas.discovery.wls.FMW_DISCOVERY_MAX_CACHE_AGE
Value: 7200000
# If caching of discovery data is true, a user logs in and a discovery session is in progress,
# this parameter indicates how long the user can wait for current discovery to complete.
# After this wait time is elapsed and discovery is still not finished: If there is already data
# in cache it will be used, else the user will launch a new discovery session.
# Time value is in milliseconds. Default is 10000 milliseconds. Key: oracle.sysman.emas.discovery.wls.FMW_DISCOVERY_MAX_WAIT_TIME
Value: 10000
We can go to Attributes Tab and verify that the new properties are available under Properties option. 5. Once Values are set, Refresh the Farm. You can now observe the difference in em page performance. If newly added components or their changed values are not getting reflected on em console, then also we should use the option to Refresh the Farm.
Now, login again to the em console and performance improvement should be observed while accessing components on the home page.
Issue with above solution:
As caching is enabled and Cache Age is set to 7200000 , it is possible that
When one of the managed server nodes are restarted, the status of the recently started managed server and its components are not displayed with the correct status till cache age is expired. This happens when you are working on the same browser screen. One can avoid this by opening em console in a different browser.
New Application deployment made through wlst/ant scripts or using JDev are not reflected on the em console till cache age expires.
In such cases, solution is to reset the values of the caching properties as required for the specific environment. It is possible that we may decrease the Cache Age value but may keep the Max Wait Time values somewhere >6500. Also, there is one more property "oracle.sysman.core.model.host.cacheAliveTime" exists for the same MBean. We can tweek its values to improve em screen perofrmance. You might also want to increase the value for "oracle.sysman.emRep.dbConn.statementCacheSize" in case of bigger cluster environments.
The solution steps can also be executed with the WLST scripting. More information on wlst commands, please go through the Oracle Support Doc ID 1423893.1. Please note that you cannot Refresh Farm using WLST script and manual refresh is required.
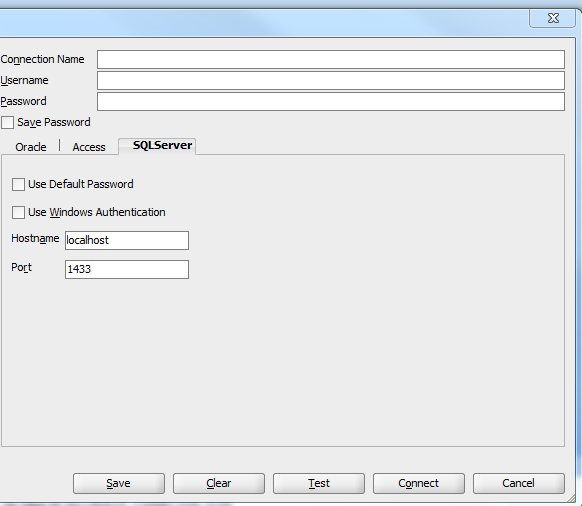
First, in SQL Developer, Open menu Tools --> Preferences. From the dialogue box, select Database --> Third Party JDBC Drivers. Click on Add Entry and add sqljdbc4.jar file into the Driver Path.
Second, Copy the jdts-1.3.1.jar file into the folder /jlib folder. jTDS, being a type 4 driver, does not need any special installation. Just drop the jar file into your application's classpath and you're done.
Restart your SQL Developer, Select New Connection option and now you can see the SQL Server Tab in the option.
Configure your database details and test the connection.
I have migrated my 10g BPEL processes to 11g. Few BPEL processes, based on input values they receive, sets the 1 to 6 index values. For a process where instance volume is higher/large, it is easy to search the instance using the index value. In 10g, I used to search on BPEL Console --> Instances tab, using "Index/Custom Key" text box. But as soon as I went to 11g, I found there is no option on em(Enterprise Manager) console to search BPEL instance using index.
After research, I found out that in 11g Oracle has not provided option to serach BPEL instance using those indexes. You can search for composites using composite indexes, but not the BPEL instances using BPEL process defined indexes. However, the values are still being stored in CI_INDEXS table under soainfra database schema.
Some simple but very useful 10g functionality is omitted even after the release of 11.1.1.4 release.
solution:
Simplest way, fire a query and get the instance ID from the ci_indexes table. But wait, it is not that easy. Let us see what exactly happens there.
I have a composite TestCompsite1. My bpel process TestHelloWorld is part of the composite TestComposite1. During execution, the bpel process setting values in ci_indexes table, say index_1 = "OracleWorld".
You can search the ci_indexes table using below query
select * from ci_indexes where index_1 like 'OracleWorld' (Add more OR conditions as you may want to search on other index keys)
You will get bpel instance number as cikey column value. But you cannot search using that output on em console as it only allows you to search based on the compsoite instance number of composite instance index values. The solution is below query, join ci_indexes with cube_instance
the column value of cube_composite_id is what exactly you will search on em console for. This will open composite. If you have multiple bpel execution, then enable "show Instance ID" option. Use the index_cikey column value to reach the correct bpel instance.
I thought this would be easy when I saw values in ci_indexes table, but it required to look further in soainfra db. For simplicity, one may like to wrap this query in report to make the life easier.
In certain cases we need to install the Database XE again. Specially when I am installing a new SOA Suite server. While uninstalling the XE, if any of your XE services are UP, your re-installation gives problem with TNSListener service startup.
you can do this,
1) Delete any of the following services if they exist in your Control Panel -> Administrative Tools -> Services.
OracleServiceXE
OracleMTSRecoveryService
OracleXEClrAgent
OracleXETNSListener
To delete the service type "sc delete [service_name]" on your command prompt.
2) Go to Registry, and delete any reference to your XE database. You can search on the folder name where XE was installed, mostly "oraclexe" to get all the references.
Now, reboot your system and then install XE again. The installation should be fine now and TNSListener service should work properly.
It has been an opportunity for me now to start writing again in my blog with SOA Suite 11g release.
I have already installed SOA Suite 11g successfully and created few processes on that, but that gave me a thought that why I should upgrade from 10.1.3.4 to 11g quickly ?
I think it is not wise to make hurry and move to 11g platform. Few reasons for that may be,
Moving to 11g platform can require substantial change or upgrade to your current 10.1.3.x infrastructure.
It was certainly easy to migrate from 10.1.3 to 10.1.3.1 to 10.1.3.3 (many would have faced lot of isses mvoing to 10133) to 10.1.3.4, but 11g is a change of application server, and Java Container. JRockit(i.e. BEA's JDK) and weblogic server (server container) had certainly been the best available in the market in BEA era, and they must be understand well before we really go for upgrade. There are more logging options and more then that a lot more configuration files (a bunch of .xml) to be understood with weblogic server domains(like instance in SOA Suite).
Fusion Middleware 11g Platform can bring substantial benefits if understood properly and implemented in right direction. So, it is not suggestable that just in order to upgrade SOA Suite, we upgrade our production servers. FMW 11g platform can bring your web applications, integration components, portal and document control components together in unified Developer studio. A good upgrade policy can save lots of bucks but still gives organization a bunch of new dimensions to do the business. Like, today organizations wants to close their multiple E-Business Suite instances just to have one single unique E-Business 12 version(preferably on-demand) and get a new life in their business, similarly platform FMW 11g can add new life in the organization if implemented with thoughtful design.
We still can go for only SOA Suite Upgrade. But remember SOA Suite 11g has many new good features like composite application concept, Entity creation concepts in BPEL projects, Business Rules component as a part of your composite application project, send notification activity, Oralce ESB as new component Median. So, you may want to plan and upgarde your current SOA Suite processes with some exciting new features before you deploy them to your SOA Suite 11g production server.
How about having Devlopment SOA Suite 11g server in parallel to your current 1013 SOA Suite development server. That would be really a good idea as it will help to understand the new functionality easily and will give us a chance to test new version for stability, performance and deployment perspective.
If you want to upgrade, please remember that
Upgarde can be carried out on all the SOA Suite Release 10.1.3.x release.
For current SOA Suite 10.1.2, we first need to upgrade to 10.1.3 and then to upgrade to 11g.
I agree that working with SOA Suite 10133 with Basic installation and configuration based on Olite keeps you busy searching for solutions to the issues you face.
On my Vista Enterprise I installed 10131 basic installation and applied the patch for 10133. Also completed the post-installation task. When I opened my BPEL Console, as I expected I could not see the flow in the instances. But the problem which annoyed me a lot was with the "Activities" tab.
I assured that all my BPEL and ESB processes were still working fine. But when I clicked on "Activities" tab after installation I got the screen with the exception message as below
Oracle BPEL Process Manager Full Cycle
An unexpected error has occurred while executing your request. This is most likely related to a defect in the Oracle BPEL Process Manager product. We apologize you can post the error to the OTN forum and we will get back to you as soon as possible.
Exception Message: http://javax.servlet.ServletException Cannot find work items. An attempt to fetch the work items using the where condition "" from the datastore has failed. The exception reported is: ODBC S1002 invalid column number Please check that the machine hosting the datasource is physically connected to the network. Otherwise, check that the datasource connection parameters (user/password) is currently valid. sql statement: SELECT * FROM admin_list_wi WHERE ci_domain_ref = 0
Exception Trace:
javax.servlet.ServletException: Cannot find work items. An attempt to fetch the work items using the where condition "" from the datastore has failed. The exception reported is: ODBC S1002 invalid column number Please check that the machine hosting the datasource is physically connected to the network. Otherwise, check that the datasource connection parameters (user/password) is currently valid. sql statement: SELECT * FROM admin_list_wi WHERE ci_domain_ref = 0
...
The solution I got was to re-run the scripts to the post-installation of 10133 patch. I could find that wi-fault table and three other views were missing from the database though they were there in the scripts.
I was testing Remote exception and Binding exception for my sample BPEL Process and thought to put the post here.
My BPEL process "exceptionRB" looks like below and calls another BPEL Process "Hello1".
To create the Remote and Binding exception I played with the "Hello1" BPEL Process.
To generate RemoteException, turn the process state of "Hello1" process to "OFF" from manage tab on BPEL console (The exception description would be that the process state is OFF). Or undeploy the "Hello1" process (exception : cannot read the WSDL).
To check Binding Exception, remove the operation "process" in "Hello1" which is called by BPEL process "exceptionRB". In my case I have change the operaion "process" to "process2" and redeployed the BPEL Process "Hello1".(Exception message would be "No such operation.")
If you are require to use lots of datetime values, then you may also need to manipulate those different datetime values. Manipulating XPath 2.0 functions may be a problem. For this, You may refer to blogs by Ramkumar Menon and Antony Reynolds.
I'm using XPath 2.0 functions to get date and time in BPEL Process. You can get more information about XPath 2.0 here. Below is the example I have created based on Ramkumar's blog to calculate the duration between two datetime values in Oracle BPEL.
and the the this xp20 functions can be used as below to extract the datetime values.
xp20:current-dateTime() - returns a dateTime element that has the current date and time as formatted above. (e.g. 2008-11-15T11:32:28.256). I'm using this function and I am to calculate difference for variable holding this value.
xp20:current-date() - returns a date element that has the current date as formatted above without the time portion.
xp20:current-time() - returns a time element that has the current time formatted as above without the date portion.
Let's look at how the XSL file is to be designed. We are creating the template "timeDifference" and using the same to find the time difference.
In the starting of the XSL file, definition of the source and target XSD.
<?xml version="1.0" encoding="UTF-8" ?> <?oracle-xsl-mapper <!-- SPECIFICATION OF MAP SOURCES AND TARGETS, DO NOT MODIFY. --> <mapSources> <source type="XSD"> <schema location="input.xsd"/> <rootElement name="input" namespace="http://www.example.org"/> </source> </mapSources> <mapTargets> <target type="XSD"> <schema location="output.xsd"/> <rootElement name="output" namespace="http://www.example.org"/> </target> </mapTargets>
XSL stylesheet version to be changed to 2.0 and looks like
<xsl:stylesheet version="2.0"
... xmlns:xp20="http://www.oracle.com/XSL/Transform/java/oracle.tip.pc.services.functions.Xpath20" xmlns:xsl="http://www.w3.org/1999/XSL/Transform" xmlns:ns0="http://www.example.org" xmlns:xsd="http://www.w3.org/2001/XMLSchema" exclude-result-prefixes="xsl ns0 xsd ora ..."> In next phase define the template and use it to calculate the difference as below
<xsl:template match="/"> <!-- Suggests that template is in this file only --> <ns0:output> <ns0:duration> <xsl:call-template name="timeDifference"> <xsl:with-param name="date1" select="/ns0:input/ns0:date1"/> <xsl:with-param name="date2" select="/ns0:input/ns0:date2"/> </xsl:call-template> </ns0:duration> </ns0:output> </xsl:template>
Here is a small example on how to create a SQL Server Connection on JDeveloper.
First of all you will need the sqljdbc.jar. You can download it from the Microsoft site. sqljdbc.jar is available across different versions SQL Server 2000, SQL Server 2005, etc. I'm connecting to SQL Server 2K here using JDeveloper 10133.
Once downloaded, we need to add it to the JDeveloper Libraries. I have listed here the steps to create a user library from JDeveloper Help:
From the main menu, choose Tools Manage Libraries.
In the Manage Libraries dialog, select the Libraries tab, then select the User node, and click New.
In the Create Library dialog, enter a library name, select the Source Path node, and click Add Entry .
In the Select Path Entry dialog, browse to the location of the drivers for the database you are connecting to. Select the driver files, and click Select.
In the Create Library dialog, click OK, and in the Manage Libraries dialog, click OK .
We can add this library while creation of databse also, but adding first using Manage Libraries is a good practice.
Now in JDeveloper, go to Connection Navigator, Right-Click on Database and select "New Database Connection" from the context menu. Follow the wizard as displayed below:
Select the last option "Thid Party JDBC Driver" from the drop-down.
On the next page, provide valid UserID and Password.
On step 3
For Driver Class, name is com.microsoft.sqlserver.jdbc.SQLServerDriver, and select the library sqljdbc.jar from Manage Libraries as we have added above.
Define the URL as below jdbc:sqlserver://<db_instance>:<port>;databaseName=<db_name>;user=<userid>;password=<password>
As a follow-up to OpenWorld, for those of you that could not attend, Oracle is hosting a live Webcast next week on Tuesday, 7-October 9AM PDT (5PM BST, 21:30 India Standard Time) "Leveraging the Enterprise Service Bus with E-Business Suite".
This post would be the first and last post in the series where we will create the ALSB example and call the BPEL service on SOA Suite.
Hope you have ceated the local server instance and after starting the server you are able to view the ALSB console at http://localhost:7001/sbconsole as per my last post. For my example, today I have created seperate server instance at port 7041, but you can always use the good old 7001 port which we created last time. Now, let's start with our example.
Start the server from WorkSpace Studio. Open the ASLB console in the browser and login. Ont he left hand side-bar you will find the "Change Center" as shown below.
Click on "Create" to activate your session. Basically, the Change Center allows for team collaboration when services and metadata are being configured in ALSB. Each user works in a sandbox session until the user is ready to check in the working configuration to the core configuration of the bus. The change center provides multiple levels of undo, and visibility into conflicts, as multiple users work on the configuration.
Now, we are ready to do the changes. click on the "Project Explorer" from the links available right below the Change Center.
You may need to scroll down to view this "Project Explorer" link. On the right hand, you will get option to create the folder.
Write a name HelloWorldExample and click on "Add Folder" and you will see the project created with name "HelloWorldExample".
You can also observe the same in left side menu of Project Explorer. Now click on "HelloWorldExample" from the list of the projects and it will open the folder "HelloWorldExample" for you.
As we created previously, create three folders inside "HelloWorldExample" namely WSDL, Business Service and Proxy Service.
Your project explorer should look like this
Now, the steps to be followed are,
1) Import WSDL URL : This will be the concrete WSDL to BPEL service.
2) Create Business Service : For the time being this can be thought as service endpoint of Oracle ESB
3) Create Proxy Service : For the time being this can be thought as routing service of Oracle ESB
4) Test the Proxy Service : This is an ALSB Test Client like we have inovke option in BPEL PM.
1) Import WSDL : inside Project Explorer, click on WSDL and you will be inside WSDL folder. From the drop-down Create Resource, select option "Resource from URL".
In URL/path give the WSDL URL. Resource Name "WSHelloWorld" and Resource Type is "WSDL". Click "Next".
It will take you to the "Review Loaded Resources" screen and shows that one WSDL and related schema files are to be imported. Select all the resources and click "Import". The resources are imported in folder WSDL.
2) Create Business Service : inside Project Explorer, click on HelloWorldExample --> Business Service and you will be inside "Business Service" folder. From the drop-down Create Resource, select option "Business Service".
Give the name "BSHelloWorld". Select WSDL Web Service option and click on Browse, From the list of Web Service select "WSHelloWorld" which we created in Option 1.
The popup will come up, select port option as displayed in the screen below and click "Submit".
You are back to create Business Services Screen, Click Next and observce the "Endpoitn URI". Go to the last step and Save.
The Business Service is successfully created.
3) Create Proxy Service : The similar way select Proxy Service folder and select option "Proxy Service" from Create Resource drop-down. Give name "PSHelloWorld".
Similar to step 2, select WSDL and create the proxy service. Once Proxy service is created, go to the folder "Proxy Service" and click on the icon Edit Message Flow".
Now, from pop-up, goto Variable Structure --> body and select the input variable from request. Drag and drop it to the Text Area on the right.
Validate the Message Flow, Save the Stage Configuration. Save the Message Flow. You are back to the Proxy Service folder.
Now, in change Center, click on "Activate", give proper description of the change and submit. Now the changes; right form creation of the Project folder to the Message Flow are applied to the Server.
4) Test the proxy Service : Click on Spider icon in Actions given for Proxy Service.
If you are getting the following error screen, then I must say that you are on the right way.
This is due to the current inability for ALSB to handle the partnerlink element in the WSDLs generated by the Oracle stack.
To sovle this issue, in change center, click on Create to create the new session, goto click on WSDL file in WSDL folder and edit the wsdl text as given below.
I'm back with next episode of ALSB. Sorry for the delay in posting this. I have decided to discuss architecture post to hands-on. Today, we will discuss how we can create server/ server domain in ALSB. This will also help to get familiarized with environment.
So, why we need to create this server? This is to define a local server instance which we can use to deploy our resources to. Once the server is available, we can go ahead to create the ALSB resources and depoly them. So, let's start creating the server ... Go to Start Menu --> BEA and select WorkSpace Studio 1.1 as shown below:
Workshop Studio is an IDE like JDeveloper. Using workspace studio, you can work with Service Bus on design time as we do with Oracle ESB in JDeveloper. Now, Workspace launcher pop up will come up and usually it would be pointing to "WorkSpaceStudio" folder where bea is istalled.
To select the default value, select "OK" and the workspace studio IDE will come up. As the workspace studio is based on Eclipse, it has different perspectives for IDE views. Go to menu Window --> Open Perspective and selct Others option. The pop up with the list of perspectives will come up as shown below:
Select "AquaLogic Service Bus" and click OK. You are back to IDE but with the ALSB perspective.
Now, in order to create new server, from the menu select File --> New --> Server. The New Server wizard will come up.
Here we have to choose the type of server we want to create. keep the server name "localhost" as it is. Make sure you have selected option "BEA WebLogic Server v10.0" from the list of servers. ALSB 3.0 is compatible only to that version. However, the new version of WebLogic Server 10.3 is now available on OTN fro download. Click "Next".
You will reach to the 2nd page of Create Server wizard. Here we have to define our server. Change the name as you find it appropriate. Then select the link "Click here to launch Configuration Wizard to create a new domain" link in order to create the new domain.
In the next screen give the username and password as you desire it. I will prefer to go with "weblogic" as both username and password.
Continue with the options as given in the screen shots below.
Select JDKs and Startup mode. In Development mode, username and password will be taken from boot.properties file and do not require to enter. For developement mode Sun JDK is suggested for better performance. On the contrast, for Produciton mode, credentials are to be entered manually and JRockit is a prefered Java kit.
Select "No" to keep the default settings for the domain. If you select "Yes" in order to customize, you will be asked for the server name, server port and many other configurations. The next post, the server used is customized on a different port 7041 while the default port is 7001.
Click Next,
Enter the Domain Name and Domain Location.
I would prefer to keep the default location /user_projects/domains as it will make the task to find the default domain folder easy. Click "Next"
The domain has been successfully created. If you want you can select the option "Start Admin Server". Click "Done" and you will be back to "New Server Wizard".
For Domain Home, browse and select the domain which you have recently created. and click "Finish" to accept the default settings.
Now, we are back to IDE, on the right bottom click on the "server" tab. you will see the server which you have just created in the list of the servers.
Right click your server and from the context menu select the option "Start" to start the server. The status of the server will change to "starting" and then "started". You can see the progress bar at the right bottom end.
Alternativerly you can always clickon the Console tab and find out the progress of the server. Generally, when server is started, you will get the last line like "sever in ". You can check from the console if there was any error while starting the server or not.
Now, the server is started, and we want to see the console in the browser. So, open the browser and type address:
You can browse through different console environments. Mainly we will be using the ALSB console to create our ALSB.
That's all for today. In next post, I will create the only ESB example of this series. I will create one ESB and we will call BPEL service from our SOA Suite server 10133. So, our example will be of kind ALSB --> BPEL. We will invoke ALSB from the ALSB Test Console, yes, ALSB has test console like BPEL inovke option in BPEL PM.
You might have surprised as why I'm not taking File or Database example in ALSB. The answer is that to achieve File and Database stuff is bit difficult in ALSB compare to adapters we are using in Oracle ESB. Also, in future, the adapter mechanism of Oralce ESB will be part of new Oracle Service Bus, so no need to concentrate on those functionalities. We are just familiarizing here with WL Server and ALSB as they are the way going forward for j2ee server and Service bus in Oracle FMW stack.
Don't forget to drop a comment if you have to share something.
Oracle's FMW strategy is out long back and OSB(Former ALSB) is the way going forward in terms of Oracle's Enterprise Service Bus product.
Also, to notice that on SOA Suite link on oracle, they have already included included OSB as an individual product. so, here I'm startingsmall series of posts on OSB that covering introduction, features, architecture, configuration and sample tutorial execution. I'm not sure but if possible I would try to compare the features of those in Oracle ESB with OSB.
First of all, I downloaded OSB from OTN. I got 867 MB of zip file consisting installable exe file named alsb300_wls100_win32. The recommended RAM requirement is 2 GB, bt i'm happy as my system has sufficient RAM to install the same.
Installing ALSB was quite smooth. Generally while installing Oracle SOA Suite 10131, I'm restarting OPMN manually to push the stuck installation.
If you will go with the default installation, you will get following three components installed on your system.
WebLogic Server 10.0
AquaLogic Service Bus 3.0
WorkSpace Studio 1.1
After successfull installation the WebLogic Server automatically comes up, this server is the way going forward the strategic J2EE server as Oracle has declared as a part of the strategy. Enter weblogic as both username and password if you want to access server's Admin Console. Like Oracle AS, this server also using jdk 5, supports EJB 3.0, WS-I and more ...
I created new Server instance for my OSB tutorials (we will discuss this in later posts). ALSB Console enables you to control the service and policy configurations, and monitor system and operations tasks. ALSB relies on WebLogic Server run-time facilities. The sbconsole(Service Bus Console) looks like this,
What I found interesting in help documents of ALSB console is the list of AquaLogic Service Bus Error Codes. These list describes the ALSB errors that can occur when a proxy service is being executed these Error Codes can be used while defining services to trap specific error in execution.
Workshop is an IDE built on the Eclipse platform that simplifies the process of developing web-based, service-oriented (SOA) and J2EE applications and looks like as below.
This is all for today, next we'll see how I created my server instance and then one example.
Let me know if you are looking for something specific from this post series of OSB.
I was reading about Forms Modernization on OTN. There are some links to good white papers and articles are available about Oracle Forms modernization; specially EuroTransplant and Griffiths Waite. Thought to put a post of my idea about how this process is executed
The key reasons for Form’s modernization could be: Retain the current Investments With continued support and investment in the technologies of your legacy applications, you have the ability to modernize from a platform of stability. Adopt New Technologies Service Oriented Architecture (SOA) allows you to realize new practices and technologies and to do so in a step-by-step basis Integrate them Both your legacy and new systems can integrate and share services allowing legacy applications to continue to run your business as you build up new systems and services.
Oracle Forms and SOA The SOA Roadmap deconstructs legacy Oracle Forms systems into elemental components and recomposes them into a vast set of new application services.
The transition from Oracle Forms client/server to SOA should be a journey, not a single transformation. A staged (that is, phased) modernization effort enables Oracle Forms applications to be migrated over time. This lengthens the period of time during which Oracle Forms remains an architectural element, but reduces the overall migration risk during that time period. The first phase focuses on protecting customer’s existing investments by stabilizing the application and upgrading it onto a supported platform. Subsequent transformation phases will then gradually evolve the application to a Service Oriented Architecture.
The most critical and also the most difficult step in the transition to SOA is the migration to an n-tier Architecture focusing on establishing the business logic as independent to the database and client application. Once this has been achieved the transition to the upper levels of the Roadmap becomes significantly easier. Critically, system modules / business processes can be migrated one at a time and proceed at different speeds through the roadmap.
As per the white paper given on OTN, there are three areas where Oracle Forms can be integrated with a Service Oriented Architecture:
• Usage of external service
With functionality recently added to Forms it is now possible to call from Forms to Java making it feasible to use Web services and BPEL processes.
• Exposure of Oracle Forms business logic to the outside world
In a world of distributed applications, Forms code might need to be moved out of Forms and into a place where it can be used by other applications.
• Using the Application Server's infrastructure
Oracle Forms coexists and integrates with Oracle's Applications Server's infrastructure functionality. Forms' integration with Oracle Single Sign-on and Enterprise Manager falls in this section.
Here I have tried to create a diagram which gives an idea about the Forms Modernization Architecture.
Fig : Possible Forms Modernized architecture, also suggests 1) Integrating Forms with SSO using Enterprise Server 2) Separating the business logic to DB 3) Exposing the Forms business logic as PL/SQL Procedure of Web service 4) By using Java, calling outside objects directly from the Forms 5) Desired Integration options a. Connecting Legacy/ERP applications using BPEL PM b. Exchanging Information with Business Partners using BPEL PM and B2B
Some points below which can be explained in details for the above diagram.
1. When Forms becomes a part of a larger setting it needs to be able to participate in application server wide functions such as maintenance and management and user authentication. It doesn't make much sense to have one application use its own authentication scheme and all the others use another scheme. In versions 9 and 10 Forms is a full member of the Application Server infrastructure and is automatically configured to be able to use both the Single Sign-on server (Oracle OID and SSO) and to be managed thru Oracle Enterprise Manager.
2. The outside world use existing Forms business logic. Forms business logic can be exposed as a Web service Or Forms business logic which can be written in PL/SQL can be called directly ad Database Objects.
What we’ve to remember is that it is possible to move Forms PL/SQL code from Forms to the database and from there expose it to the outside world, either as a database procedure/function or as a PL/SQL Web service.
3. Oracle Forms use of external services hinges on recent functionality regarding Java integration. Oracle Forms can call out to Java on the file system. It can make use of Java beans and its native screen widgets can be customized with custom Java code (the Pluggable Java Component architecture). In this section we are going to touch on the functionality of calling out to Java code residing on the file system.
Once that functionality put in place Oracle Forms ables to call all kinds of external services such as Web services and be part of a BPEL process flow.
4. WebFoms : WebForms could be achieved by running APS on a Web server and emulating the graphical user interface in a generic applet in the client. So, instead of the traditional Oracle Client Server Forms solution, a Java UI can be presented to the user within a browser. The N-tier architecture of Web Forms is much more responsive when run across a large company network, significantly reducing the network traffic between the client and the data center, compared to the client/server architecture.




 Posts
Posts


