So, why we need to create this server? This is to define a local server instance which we can use to deploy our resources to. Once the server is available, we can go ahead to create the ALSB resources and depoly them. So, let's start creating the server ... Go to Start Menu --> BEA and select WorkSpace Studio 1.1 as shown below:
Workshop Studio is an IDE like JDeveloper. Using workspace studio, you can work with Service Bus on design time as we do with Oracle ESB in JDeveloper. Now, Workspace launcher pop up will come up and usually it would be pointing to "WorkSpaceStudio" folder where bea is istalled.
To select the default value, select "OK" and the workspace studio IDE will come up. As the workspace studio is based on Eclipse, it has different perspectives for IDE views. Go to menu Window --> Open Perspective and selct Others option. The pop up with the list of perspectives will come up as shown below:
Select "AquaLogic Service Bus" and click OK. You are back to IDE but with the ALSB perspective.
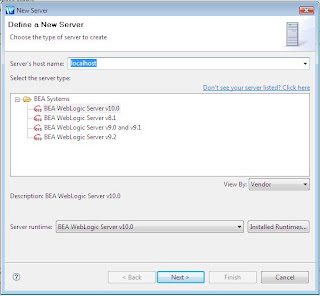
Now, in order to create new server, from the menu select File --> New --> Server. The New Server wizard will come up.
Here we have to choose the type of server we want to create. keep the server name "localhost" as it is. Make sure you have selected option "BEA WebLogic Server v10.0" from the list of servers. ALSB 3.0 is compatible only to that version. However, the new version of WebLogic Server 10.3 is now available on OTN fro download. Click "Next".
You will reach to the 2nd page of Create Server wizard. Here we have to define our server. Change the name as you find it appropriate. Then select the link "Click here to launch Configuration Wizard to create a new domain" link in order to create the new domain.
In the next screen give the username and password as you desire it. I will prefer to go with "weblogic" as both username and password.
Continue with the options as given in the screen shots below.
Select JDKs and Startup mode. In Development mode, username and password will be taken from boot.properties file and do not require to enter. For developement mode Sun JDK is suggested for better performance. On the contrast, for Produciton mode, credentials are to be entered manually and JRockit is a prefered Java kit.
Select "No" to keep the default settings for the domain. If you select "Yes" in order to customize, you will be asked for the server name, server port and many other configurations. The next post, the server used is customized on a different port 7041 while the default port is 7001.
Click Next,
Enter the Domain Name and Domain Location.
I would prefer to keep the default location
The domain has been successfully created. If you want you can select the option "Start Admin Server". Click "Done" and you will be back to "New Server Wizard".
For Domain Home, browse and select the domain which you have recently created. and click "Finish" to accept the default settings.
Now, we are back to IDE, on the right bottom click on the "server" tab. you will see the server which you have just created in the list of the servers.
Right click your server and from the context menu select the option "Start" to start the server. The status of the server will change to "starting" and then "started". You can see the progress bar at the right bottom end.
Alternativerly you can always clickon the Console tab and find out the progress of the server. Generally, when server is started, you will get the last line like "sever in
Now, the server is started, and we want to see the console in the browser. So, open the browser and type address:
http://localhost:7001/sbconsole for ALSB console and
http://localhsot:7001/console for WebLogic console.
You can browse through different console environments. Mainly we will be using the ALSB console to create our ALSB.
That's all for today. In next post, I will create the only ESB example of this series. I will create one ESB and we will call BPEL service from our SOA Suite server 10133. So, our example will be of kind ALSB --> BPEL. We will invoke ALSB from the ALSB Test Console, yes, ALSB has test console like BPEL inovke option in BPEL PM.
You might have surprised as why I'm not taking File or Database example in ALSB. The answer is that to achieve File and Database stuff is bit difficult in ALSB compare to adapters we are using in Oracle ESB. Also, in future, the adapter mechanism of Oralce ESB will be part of new Oracle Service Bus, so no need to concentrate on those functionalities. We are just familiarizing here with WL Server and ALSB as they are the way going forward for j2ee server and Service bus in Oracle FMW stack.
Don't forget to drop a comment if you have to share something.
Cheers
Nirav


1 comment:
Really good article with OSB explained in a simple manner where begineers like me find it easy and interesting.
Expecting another OSB series from u
Post a Comment